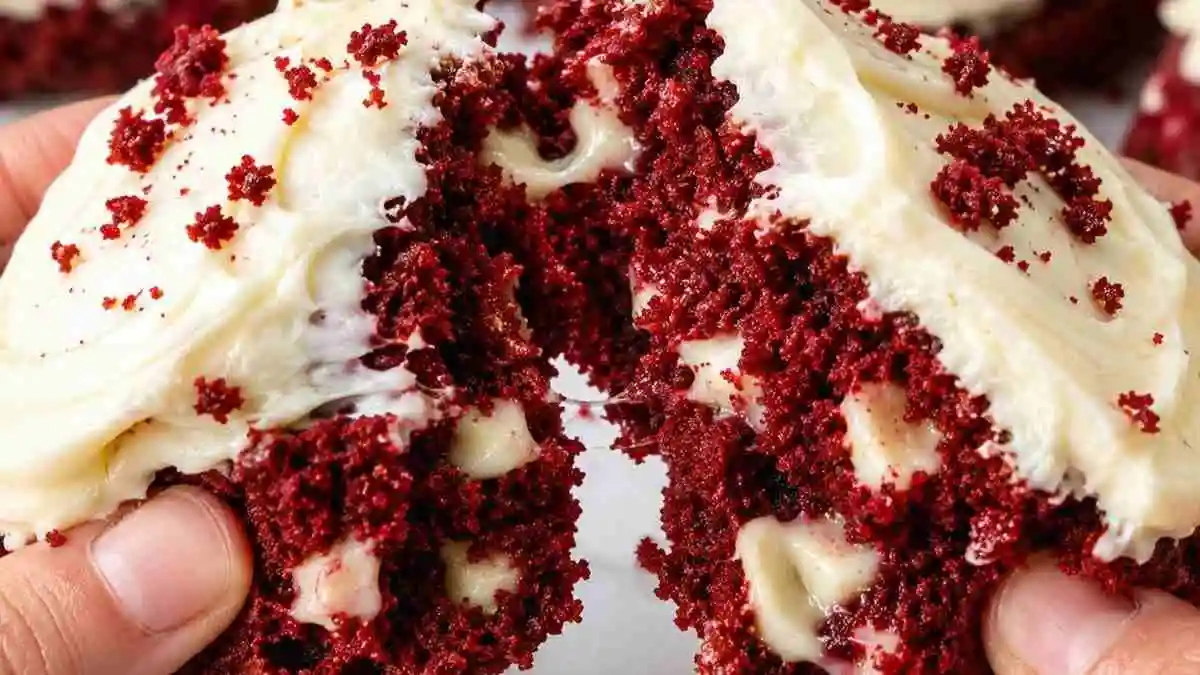
Red velvet cookie bars bring together everything that’s good about a soft cookie and a rich, chewy dessert bar. With their beautiful red color, buttery center, and sweet white chocolate chips, they’re perfect for Valentine’s Day, Christmas, birthday parties, or an afternoon baking treat.
One thing worth noticing about red velvet desserts is how easily their texture can change. A little too much flour makes them cakey, while overbaking takes away that lovely soft center.
This recipe keeps things simple. There’s no chilling the dough, rolling individual cookies, or preparing complicated frosting.
Just mix the ingredients, spread the dough into one baking pan, and let the oven handle the rest. The result is a batch of tender cookie bars with slightly crisp edges and a delicious chocolate-vanilla flavor.
Why You’ll Love This Recipe
- Soft and chewy: Buttery centers, delicate cocoa flavor, and sweet white chocolate in every bite.
- Easy preparation: One baking pan and no individual cookie shaping required.
- Family-friendly: A colorful dessert that’s fun to prepare with kids.
- Perfect for sharing: These bars travel well and look beautiful on holiday dessert trays.
What Makes These Red Velvet Cookie Bars So Good?
The secret is getting the balance between butter, cocoa powder, and brown sugar just right.
Brown sugar adds moisture, while a small amount of cocoa gives the bars their signature red velvet flavor without making them taste like regular chocolate brownies.
White chocolate chips bring extra sweetness and little pockets of creamy chocolate throughout the dough.
Unlike traditional red velvet cake, these bars have a denser, cookie-like texture. The edges develop a gentle crispness, but the middle stays soft.
And because everything bakes together in one pan, every square has that satisfying homemade cookie texture.
Ingredients
Main Ingredients
- For one 8×8-inch baking pan, you’ll need:
- ½ cup (113 g) unsalted butter, melted and slightly cooled
- ¾ cup (150 g) packed light brown sugar
- ¼ cup (50 g) granulated sugar
- 1 large egg, room temperature
- 2 teaspoons vanilla extract
- 1 teaspoon red gel food coloring, or enough for your desired shade
- 1¼ cups (156 g) all-purpose flour
- 1 tablespoon unsweetened cocoa powder
- ½ teaspoon baking powder
- ¼ teaspoon salt
- ¾ cup (130 g) white chocolate chips

Ingredient Notes
- Cocoa Powder: Use regular unsweetened cocoa powder for a classic red velvet flavor.
- Brown Sugar: Light brown sugar adds moisture and helps create a soft, chewy texture.
- Food Coloring: Gel food coloring gives a vibrant red shade without adding excess liquid.
- White Chocolate Chips: Choose good-quality chips for a smooth, creamy sweetness.
- Butter: Unsalted butter gives you better control over the flavor and salt level.
Optional Add-ins
- Want to change things slightly? Try:
- ¼ cup chopped pecans for crunch.
- 2 tablespoons mini chocolate chips.
- A small handful of festive sprinkles.
- A pinch of espresso powder to deepen the cocoa flavor.
A little orange zest for a subtle citrus note.
Avoid adding too many extras, or the cookie bars may become difficult to slice neatly.
For Serving
- Vanilla Ice Cream: Adds a creamy contrast to slightly warm cookie bars.
- Fresh Strawberries: Bring a refreshing fruity flavor and beautiful color.
- Powdered Sugar: Dust lightly over cooled bars for a simple finishing touch.
- Melted White Chocolate: Drizzle over the top for a pretty bakery-style presentation.
Best Chocolate for Red Velvet Cookie Bars
White chocolate is an excellent match for red velvet because its creamy sweetness balances the mild cocoa flavor.
White chocolate chips are convenient, but chopped white chocolate from a good-quality baking bar also works beautifully.
For a less sweet dessert, replace one-third of the white chocolate chips with semisweet chocolate chips.
Avoid using chocolate syrup in the dough. It changes the moisture balance and can affect how the bars bake.
How to Make Red Velvet Cookie Bars
Step 1: Prepare the Baking Pan
Preheat your oven to 350°F (175°C).
Line an 8×8-inch baking pan with parchment paper, leaving a little overhang on two sides. This makes removing the finished bars much easier.
Lightly grease any exposed sides of the pan.
Step 2: Mix the Cookie Dough
In a large mixing bowl, whisk the melted butter, brown sugar, and granulated sugar until combined.
Add the egg, vanilla extract, and red food coloring. Mix until the color looks even.
In another bowl, combine the flour, cocoa powder, baking powder, and salt.
Gradually stir the dry ingredients into the wet mixture. Stop mixing once no dry flour remains.
Fold in the white chocolate chips.
Step 3: Bake Until Just Set
Spread the thick cookie dough evenly into your prepared baking pan.
Sprinkle a few extra white chocolate chips over the surface.
Bake for 22–27 minutes, until the edges look set and the center no longer appears wet.
A toothpick inserted near the middle should come out with a few moist crumbs rather than raw batter.
Step 4: Cool, Slice, and Serve
Remove the pan from the oven and place it on a cooling rack.
Allow the bars to cool in the pan for at least 30 minutes before lifting them out using the parchment paper.
Cut into 16 squares with a sharp knife.
For particularly neat slices, let the bars cool completely and wipe the knife between cuts.
A Small Kitchen Observation
The most useful detail with this recipe is the appearance of the center near the end of baking. Red velvet dough can look darker while it’s hot, making it tempting to leave the pan in the oven longer. But the bars continue firming up as they cool. Removing them when the edges are set and the middle has a few moist crumbs helps preserve that soft cookie texture. Cutting them too early can also make the center appear underdone, even when the baking time was correct.
My Pro Tips & Kitchen Notes
- Measure flour carefully: Too much flour creates dry bars. Spoon flour into the measuring cup and level it off.
- Use slightly cooled butter: Very hot butter can affect the egg and change the dough’s consistency.
- Don’t overmix: Excessive mixing develops gluten, making the bars tougher.
- Check the center early: Start checking around 22 minutes to prevent overbaking.
- Use parchment paper: It prevents sticking and helps you lift out the entire batch without breaking the edges.
Make Ahead Tips
You can prepare the cookie dough up to 24 hours before baking.
Cover the mixing bowl tightly and refrigerate. Allow the dough to sit at room temperature briefly so it’s easier to spread.
Alternatively, bake the bars one day before serving. Their flavor settles nicely overnight, and they’re easier to cut once completely cooled.
Alternative Cooking Methods
Air Fryer: Use a small, air-fryer-safe baking pan. Bake at 320°F (160°C) for approximately 16–22 minutes, checking the center regularly. Timing depends on your air fryer and pan size.
Conventional Oven: The standard 350°F method gives the most consistent results for this recipe.
Mini Cookie Bars: Divide the dough between lined mini baking molds and begin checking after 12 minutes. Smaller portions bake faster.
A slow cooker isn’t ideal here because trapped moisture prevents the cookie bars from developing their characteristic edges.
Recipe Variations
- Cream Cheese Swirl: Mix softened cream cheese with a little powdered sugar and swirl small spoonfuls into the dough before baking.
- Dark Chocolate Version: Replace white chocolate chips with semisweet chocolate for a richer flavor.
- Holiday Cookie Bars: Add red, white, and green sprinkles for Christmas or pink sprinkles for Valentine’s Day.
- Nutty Version: Fold chopped walnuts or pecans into the dough for extra texture.
- Less Sweet Version: Reduce the white chocolate chips to ½ cup. Keep the base sugar measurements unchanged to preserve the intended texture.
Ingredient Swaps
Missing something? These simple substitutions can help.
| Instead of | Try Using |
| Unsalted butter | Salted butter; omit the added salt. |
| Light brown sugar | Dark brown sugar for a deeper molasses flavor. |
| White chocolate chips | Chopped white chocolate. |
| Vanilla extract | Vanilla bean paste in equal amounts. |
| Red gel coloring | Liquid red food coloring, added gradually. |
| All-purpose flour | A suitable 1:1 gluten-free baking flour blend, although the texture may differ. |
Common Mistakes to Avoid
Overbaking: The bars become dry when left in the oven too long. Remove them once the center is just set.
Using too much cocoa: Excess cocoa can overpower the mild red velvet flavor and darken the color.
Cutting while hot: Warm cookie bars may crumble. Give them enough cooling time.
Using the wrong pan size: A larger pan creates thinner bars that bake faster.
Adding too much coloring: Start with a small amount and increase gradually.
What to Serve With Red Velvet Cookie Bars
A cold glass of milk is a classic pairing, especially when the bars are slightly warm.
For a more indulgent dessert, serve a square with vanilla bean ice cream and a few sliced strawberries.
Coffee, hot chocolate, and unsweetened iced tea also pair nicely with the sweetness of white chocolate.
If you’re preparing a holiday dessert table, arrange the bars alongside fresh berries and simple butter cookies.
For more cozy, fruit-forward or bakery-style desserts to share with family, explore our quick easy cinnamon rolls with crescent roll dough or fudgy banana bread brownies.
Storage & Freezing Tips
Room Temperature: Store completely cooled bars in an airtight container for up to 3 days.
Refrigerator: Keep them refrigerated for up to 5 days. Allow them to reach room temperature before serving for a softer texture.
Freezer: Wrap individual bars in plastic wrap and place them inside a freezer-safe container. Freeze for up to 2 months for best quality.
Thawing: Leave frozen bars in the refrigerator overnight or at room temperature until softened.
For a freshly baked feel, warm an individual bar in the microwave for approximately 8–10 seconds.
Estimated Nutrition
- Nutrition values are approximate and may vary depending on ingredient brands and portion sizes.
Frequently Asked Questions
Can I make red velvet cookie bars without food coloring?
Yes. Food coloring affects the appearance rather than the basic flavor. Without it, the bars will have a light cocoa-brown color.
Why are my cookie bars dry?
Overbaking or adding too much flour is usually responsible. Measure carefully and remove the pan when the center is just set.
Can I use a 9×9-inch baking pan?
Yes, but the bars will be thinner. Begin checking for doneness around 18 minutes.
Can I add cream cheese frosting?
Absolutely. Spread a thin layer of cream cheese frosting over completely cooled bars. Store frosted bars in the refrigerator.
How do I keep cookie bars soft?
Avoid overbaking and store them in an airtight container after cooling. Brown sugar also helps maintain their chewy texture.
Cook’s Tip
For an attractive bakery-style finish, reserve two tablespoons of white chocolate chips and gently press them into the top of the dough before baking.
This keeps some chocolate visible on the surface instead of having every chip hidden inside the bars.
It’s a small detail, but it makes the finished squares especially appealing for dessert trays and food photography.
Conclusion
These red velvet cookie bars are a lovely option when you want something homemade without spending hours in the kitchen.
Their soft centers, delicate cocoa flavor, buttery edges, and creamy white chocolate make them a little different from ordinary chocolate chip cookies.
They’re easy enough for casual weekend baking yet colorful enough for Valentine’s Day, Christmas, and special celebrations.
The biggest trick is simply knowing when to take them out of the oven. Give them time to cool, cut them into generous squares, and enjoy a dessert that tastes just as inviting as it looks.
For more effortless and crowd-pleasing dessert ideas, try serving these bars alongside our fun strawberry cheesecake tacos or Irresistible cheesecake brownies.
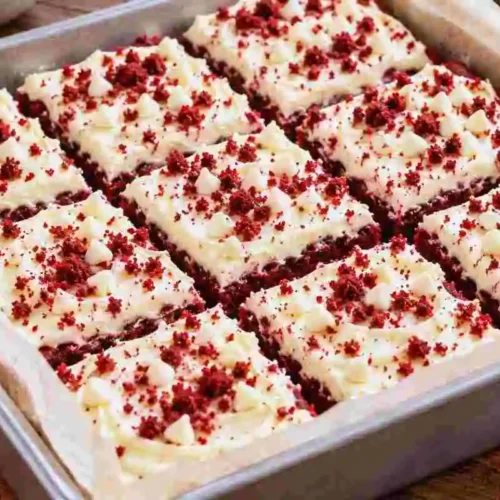
Red Velvet Cookie Bars
Equipment
- 8×8-inch baking pan
- Large mixing bowl
- Medium Mixing Bowl
- Whisk
- Rubber spatula
- Measuring cups and spoons
- Parchment paper
- Cooling Rack
- Sharp knife
Ingredients
- ½ cup 113 g unsalted butter, melted and slightly cooled
- ¾ cup 150 g light brown sugar, packed
- ¼ cup 50 g granulated sugar
- 1 large egg room temperature
- 2 teaspoons vanilla extract
- 1 teaspoon red gel food coloring or as needed
- 1¼ cups 156 g all-purpose flour
- 1 tablespoon unsweetened cocoa powder
- ½ teaspoon baking powder
- ¼ teaspoon salt
- ¾ cup 130 g white chocolate chips
Instructions
- Preheat the Oven: Preheat your oven to 350°F (175°C). Line an 8×8-inch baking pan with parchment paper, leaving some overhang for easy removal.Mix Wet Ingredients: In a large bowl, whisk together the melted butter, brown sugar, and granulated sugar. Add the egg, vanilla extract, and red food coloring. Mix until smooth and evenly colored.Combine Dry Ingredients: In a separate bowl, whisk together the flour, cocoa powder, baking powder, and salt.Prepare Cookie Dough: Gradually add the dry ingredients to the wet mixture. Stir gently until just combined. Fold in the white chocolate chips.Spread the Dough: Transfer the cookie dough to the prepared baking pan. Spread evenly using a spatula.Bake: Bake for 22–27 minutes, until the edges are set and a toothpick inserted into the center comes out with a few moist crumbs.Cool: Remove from the oven and allow the bars to cool in the pan for at least 30 minutes.Slice and Serve: Lift the cooled cookie bars out using the parchment paper. Cut into 16 squares and serve.